Mastering How to Make Handmade Cards: Your Ultimate Guide
how to make handmade cards

Mastering How to Make Handmade Cards: Your Ultimate Guide

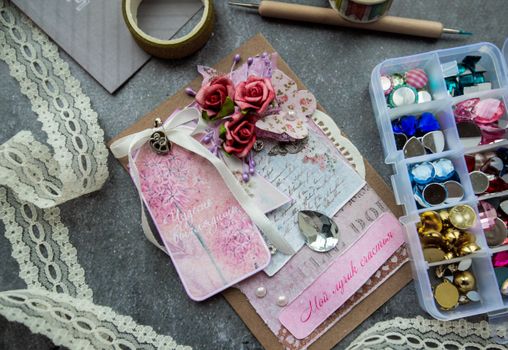
Top view of handicraft greeting card decorated with artificial flowers and fancy stones placed on table near box of colorful beads and buttons and tape lacePhoto: Victoria Emerson / Pexels

Mastering How to Make Handmade Cards: Your Ultimate Guide

Unlock your creativity and craft stunning, heartfelt cards that leave a lasting impression on your loved ones.

Start Crafting Now

Key Takeaways

  • ✓ Handmade cards offer a personal touch unmatched by store-bought options.
  • ✓ A variety of techniques, from stamping to die-cutting, can be combined for unique results.
  • ✓ Basic supplies like paper, scissors, and adhesive are all you need to begin.
  • ✓ Creating handmade cards is a relaxing and rewarding hobby that fosters creativity.

How It Works

1
Gather Your Essential Supplies

Before diving into card making, ensure you have quality cardstock, cutting tools, adhesives, and embellishments ready. Having everything organized will streamline your creative process.

2
Design Your Card Layout

Sketch out your card idea on scrap paper first, considering the occasion, recipient, and desired aesthetic. This planning step helps visualize the final product and prevents costly mistakes.

3
Assemble and Decorate

Carefully cut and adhere your chosen elements, building layers and adding decorative touches like stamps, ribbons, or glitter. Pay attention to balance and focal points to create a visually appealing design.

4
Add a Personal Message

The final touch is a heartfelt, handwritten message inside, making your handmade card truly special. This personal sentiment transforms a craft into a cherished keepsake for the recipient.

The Art of Crafting Personalized Greeting Cards
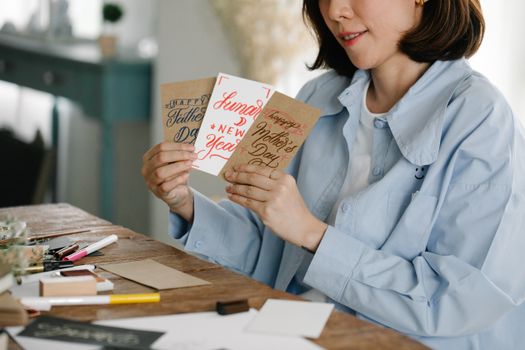
Woman holding greeting cards for holidays like Father's Day and New Year's.Photo: Katya Wolf / Pexels
There’s an undeniable magic in receiving a handmade card. In an age dominated by digital communication, the tangible warmth of a carefully crafted greeting stands out, conveying a level of thoughtfulness that no e-card can replicate. Learning how to make handmade cards isn't just about glue and paper; it's about investing a piece of yourself into a message, creating a miniature work of art that holds sentimental value long after the occasion has passed. This guide will take you through every essential step, from understanding the fundamental materials to mastering advanced techniques, ensuring your handmade cards are not only beautiful but also deeply personal and impactful. We'll explore the various reasons why embarking on this creative journey is so rewarding, touching on the joy it brings to both the creator and the recipient. The beauty of handmade cards lies in their versatility. You can tailor every aspect – from the color palette and texture of the paper to the choice of embellishments and the sentiment expressed – to perfectly suit the individual and the occasion. Whether it’s a birthday, anniversary, thank you, or simply a 'thinking of you' note, a handmade card becomes a unique extension of your feelings. It's a tangible representation of the time, effort, and love you’ve poured into celebrating or comforting someone. Beyond the aesthetic appeal, the process of craft itself is incredibly therapeutic. Many card makers find solace and joy in the tactile experience of cutting, gluing, stamping, and arranging, turning what might seem like a simple hobby into a meditative practice. It’s an opportunity to unplug from screens, engage your hands and mind, and express your creativity in a meaningful way. This section will lay the groundwork, helping you understand the core philosophy behind handmade card making and why it continues to be a cherished art form. Moreover, making your own cards can be a surprisingly cost-effective hobby in the long run. While initial investments in tools and supplies might seem daunting, many items are reusable, and you can often create multiple cards from a single pack of specialty paper or a set of stamps. This allows for greater customization and higher quality than many store-bought options, often at a fraction of the price per card. Think about the satisfaction of knowing you’ve produced a high-quality, personalized item for less than the cost of a generic card from a boutique. We’ll delve into how to build a smart, efficient crafting stash without breaking the bank, focusing on multi-purpose items and creative ways to repurpose materials. This thoughtful approach ensures that your card-making journey is sustainable and enjoyable, fostering a continuous cycle of creativity without unnecessary expenditure. Ultimately, creating personalized greeting cards is a delightful way to connect with others, express your emotions, and cultivate a rewarding creative outlet.

Essential Supplies for Your Card Making Journey

Embarking on the journey of how to make handmade cards requires a foundational understanding of the tools and materials that will become your creative companions. While the world of craft supplies is vast and can be overwhelming, starting with a curated selection of essentials will set you up for success without unnecessary clutter or expense. The cornerstone of any handmade card is quality paper. You'll want to invest in a good variety of cardstock, typically ranging from 80lb to 110lb cover weight. This heavier paper provides a sturdy base that won't easily bend or tear, ensuring your cards stand up beautifully. Look for acid-free options to prevent yellowing over time, preserving your creations for years to come. Beyond plain cardstock, consider patterned papers, vellum, and specialty papers with unique textures or finishes to add visual interest and depth to your designs. Next, precision cutting tools are indispensable. A sharp pair of craft scissors is a must for intricate details, but for straight, clean cuts on cardstock, a paper trimmer is a game-changer. Manual rotary trimmers or guillotine-style trimmers offer consistent results and save a tremendous amount of time. For more advanced shapes and designs, a die-cutting machine (manual or electronic) opens up a world of possibilities, allowing you to cut complex patterns with ease. Adhesives are another critical component; not all glues are created equal. You’ll want a strong, fast-drying liquid adhesive for general construction, double-sided adhesive tape for clean, flat applications, and foam adhesive dots or tape for adding dimension and lift to elements. Experiment with different types to find what works best for your style and materials. Embellishments are where your cards truly come to life and reflect your personal aesthetic. Stamps and ink pads are incredibly versatile, allowing you to add sentiments, patterns, and imagery. Clear acrylic stamps are popular for their ease of use and ability to see where you're stamping, while rubber stamps offer crisp impressions. Consider a variety of ink pad colors and types (dye inks for quick drying, pigment inks for opaque coverage). Ribbons, buttons, sequins, glitter, beads, and charms are just a few examples of elements that can transform a simple card into a dazzling masterpiece. Don't forget basic tools like a bone folder for crisp creases, a ruler for accurate measurements, and a pencil and eraser for sketching out designs. As you gain experience, you might explore tools like scoring boards, heat embossing kits, or blending brushes, but these core supplies provide a solid foundation for countless creative projects. Remember, the key is to start with the basics and gradually expand your collection as your skills and interests evolve, ensuring every purchase is a valuable addition to your crafting arsenal.

Mastering Techniques: From Basic to Beautiful Designs

Once you have your essential supplies, the exciting part begins: exploring the myriad techniques that allow you to transform simple paper into stunning handmade cards. Understanding these techniques is crucial to elevate your designs and truly make them your own. One of the most fundamental techniques is layering. By cutting different sizes and shapes of paper and adhering them on top of each other, you can create depth and visual interest. Experiment with contrasting colors, patterns, and textures to build dynamic backgrounds or focal points. A well-layered card feels substantial and visually rich, drawing the eye to its intricate details. Precision in cutting and adhering layers is key to achieving a professional finish, so take your time and use reliable adhesives. Stamping is another cornerstone of card making, offering endless possibilities for adding sentiments, images, and patterns. Beyond simply pressing an inked stamp onto paper, you can explore techniques like masking (covering part of an image to stamp another over it), heat embossing (using special powder and heat to create raised, shiny designs), and watercolor stamping (using water-based inks and a brush for painterly effects). Combining multiple stamps to create a scene or repeating a pattern for a custom background can yield incredibly unique results. Don't be afraid to mix and match stamp sets to create truly personalized compositions. The versatility of stamping makes it an invaluable skill for any card maker, allowing for intricate details and consistent designs. For more inspiration on creative applications, check out this guide on craft techniques. Die-cutting, whether with manual machines or electronic cutters, opens up a world of intricate shapes and designs that are difficult or impossible to cut by hand. From delicate lace patterns and elaborate sentiments to three-dimensional elements like flowers and boxes, die-cutting adds a professional and polished look to your cards. Many dies come in sets, allowing you to cut multiple layers for added dimension or create perfectly aligned frames. Embossing folders, used with die-cutting machines, create raised textures and patterns on paper, adding an elegant tactile element without additional layers. These techniques can transform plain cardstock into something extraordinary, providing a sophisticated backdrop or a striking focal point for your card. Finally, don't underestimate the power of embellishments and finishing touches. Ribbons, twine, buttons, sequins, glitter, and enamel dots can add sparkle, texture, and a pop of color. Consider how these elements complement your design rather than overwhelm it. A strategically placed bow or a scattering of tiny gems can complete a card beautifully. Experiment with different ways to attach embellishments – liquid glue, glue dots, or even stitching – to find what works best. Mastering these techniques, from basic layering to advanced die-cutting and thoughtful embellishing, will empower you to create truly unique and heartfelt handmade cards that will be cherished by their recipients.

Common Mistakes to Avoid and Pro Tips for Success

As you delve deeper into how to make handmade cards, you'll inevitably encounter challenges. Learning from common mistakes and adopting professional tips can significantly improve the quality and enjoyment of your crafting experience. One frequent pitfall for beginners is using low-quality materials. While it might seem cost-effective to use thin paper or cheap adhesives, these often lead to flimsy cards that fall apart or look unprofessional. Invest in good quality cardstock (at least 80lb), reliable permanent adhesives, and decent cutting tools. This upfront investment will save you frustration and yield much better results, ensuring your beautiful designs last. Another common error is over-embellishing. While adding decorative elements is fun, too many can make a card look cluttered and lose its focal point. Think of embellishments as accents, not the main event. Aim for balance and harmony in your design. Try the 'less is more' approach, often finding that a few carefully chosen elements have more impact than a multitude. Similarly, don't be afraid of white space (or empty space). It allows your design elements to breathe and helps highlight your focal points, making your card look sophisticated and intentional. A common mistake in design is neglecting the recipient and occasion. Always keep these in mind; a card for a child's birthday will differ greatly from a sympathy card for an adult. Pro Tip 1: Always pre-plan your layout. Before gluing anything down, arrange your elements on your card base to visualize the final design. Take a photo with your phone to compare different layouts. This helps catch potential issues and refine your composition before committing with adhesive. Pro Tip 2: Use a bone folder for crisp creases. A perfectly creased card looks professional and holds its shape better. Don't just fold by hand; use a bone folder along a straight edge for a sharp, clean fold every time. Pro Tip 3: Invest in a good paper trimmer. Straight cuts are fundamental to a polished card. A quality paper trimmer will ensure your card bases and layers are perfectly square and sized, preventing crooked or uneven edges. Pro Tip 4: Master your adhesives. Understand when to use liquid glue (for strong bonds on textured surfaces), double-sided tape (for flat, clean adhesion), and foam dots/tape (for dimension). Using the right adhesive in the right place prevents warping, unsightly bumps, or elements falling off. Pro Tip 5: Don't be afraid to experiment. The beauty of handmade cards is their unique nature. Try new color combinations, mix different techniques, or use unexpected materials. Some of the most beautiful cards come from creative experimentation. Finally, practice makes perfect. Your first cards might not be masterpieces, but with each one, your skills will improve, and your confidence will grow. Embrace the learning process and enjoy the journey of creating something beautiful with your own hands.

Comparison

FeatureHandmade CardsStore-Bought Cards (Standard)Digital E-Cards
Personalization✓ (Fully Customizable)✗ (Limited Options)✓ (Template-Based)
Sentimental ValueHigh (Unique, Time Invested)Moderate (Convenient)Low (Ephemeral)
Cost per CardVariable (Depends on Materials)Moderate to HighLow to Free
Time InvestmentHighLowLow
Environmental ImpactCan be Low (Recycled materials)Moderate (Mass Production)Very Low
Tangibility✓ (Physical Keepsake)✓ (Physical, Often Discarded)✗ (Non-physical)
Skill RequiredSome (Beginner to Advanced)NoneNone

What Our Readers Say

5 ★★★★★

"This guide truly demystified how to make handmade cards for me! I used to think it was too complicated, but the step-by-step instructions and supply breakdown made it so accessible. My first birthday card turned out beautifully, and my friend absolutely loved the personal touch."

5 ★★★★★

"As a beginner crafter, I found the section on essential supplies incredibly helpful. It prevented me from overspending on unnecessary items and focused me on what truly matters. I'm now confidently making cards for every occasion and enjoying the creative process immensely."

5 ★★★★★

"Following the tips in this article, I was able to create a stunning wedding invitation suite for my sister that looked professionally made. The advice on layering and using a bone folder made all the difference in achieving a polished, high-quality finish. Highly recommend!"

4 ★★★★☆

"The guide is comprehensive, although I would have appreciated a bit more on specific advanced stamping techniques. Nevertheless, the section on avoiding common mistakes was a real eye-opener and has definitely improved my card-making game."

5 ★★★★★

"I'm a seasoned card maker, but I still found fresh inspiration and useful reminders in this article, especially the 'less is more' approach to embellishments. It's a fantastic resource for anyone, regardless of their experience level, looking to refine their handmade card skills."

Frequently Asked Questions

What are the absolute basic supplies I need to start making handmade cards?
To begin making handmade cards, you'll need quality cardstock (80-110lb), a good pair of craft scissors, a reliable adhesive (like a strong liquid glue or double-sided tape), and a ruler. A bone folder for crisp creases is also highly recommended, and a pencil for sketching designs.
Is making handmade cards really cheaper than buying them?
While the initial investment in tools and quality supplies can seem higher, in the long run, making handmade cards can be more cost-effective. Many supplies are reusable for numerous cards, and you get a custom, high-quality product that often surpasses store-bought options in value and sentiment.
How do I make my cards look professional and not 'homemade'?
To achieve a professional look, focus on clean cuts (using a paper trimmer helps!), crisp creases with a bone folder, and careful adhesive application to avoid bumps or warping. Pay attention to design balance, avoid over-embellishing, and invest in good quality cardstock and inks. Practice also significantly improves skill.
What's the best type of paper for card bases?
For card bases, 80lb to 110lb cover weight cardstock is ideal. This weight provides a sturdy foundation that won't easily bend or feel flimsy. Look for acid-free paper to ensure your cards last without yellowing over time, preserving your beautiful creations.
How do handmade cards compare to digital e-cards in terms of impact?
Handmade cards generally have a much higher sentimental impact than digital e-cards. They represent a tangible investment of time and effort, offering a physical keepsake that can be held and cherished. While e-cards are convenient, they lack the personal touch and lasting presence of a handcrafted greeting.
Who should consider making handmade cards?
Anyone looking for a creative outlet, a way to express heartfelt sentiments, or to give truly unique and personalized gifts should consider making handmade cards. It's perfect for those who enjoy crafting, value personal connections, and appreciate the art of thoughtful giving.
Are there any safety concerns with card making supplies?
Generally, card making supplies are safe. However, always exercise caution with sharp tools like scissors, craft knives, and paper trimmers, especially around children. Use glues in well-ventilated areas if they have strong fumes, and store small embellishments out of reach of young children or pets to prevent choking hazards.
What are the emerging trends in handmade card design?
Current trends in handmade card design include minimalist aesthetics with clean lines and simple sentiments, mixed media approaches combining various textures and materials, interactive cards with moving parts or pop-ups, and a strong focus on sustainable and eco-friendly materials. Watercolor effects and intricate die-cut patterns also remain popular.

Ready to transform your heartfelt messages into beautiful works of art? Start your journey on how to make handmade cards today, and bring joy and personal connection to every special occasion. Your creativity awaits!

Topics: how to make handmade cardscard making techniquesDIY greeting cardshandmade card suppliespersonalized cards
Leo List
Brampton weed
Adultwork EstrelaBet Vai de Bet R7 Bet Betão Galera Bet Rainbet Bet9ja Shop SportyBet BetKing Sisal Loto Foot Hollywoodbets YesPlay Odibets RushBet Jugabet BetWarrior BetCity MSport betPawa Fortebet